My Slab House is Being Damaged by Continuous Movement of the Ground Up and Down After Quake
Description
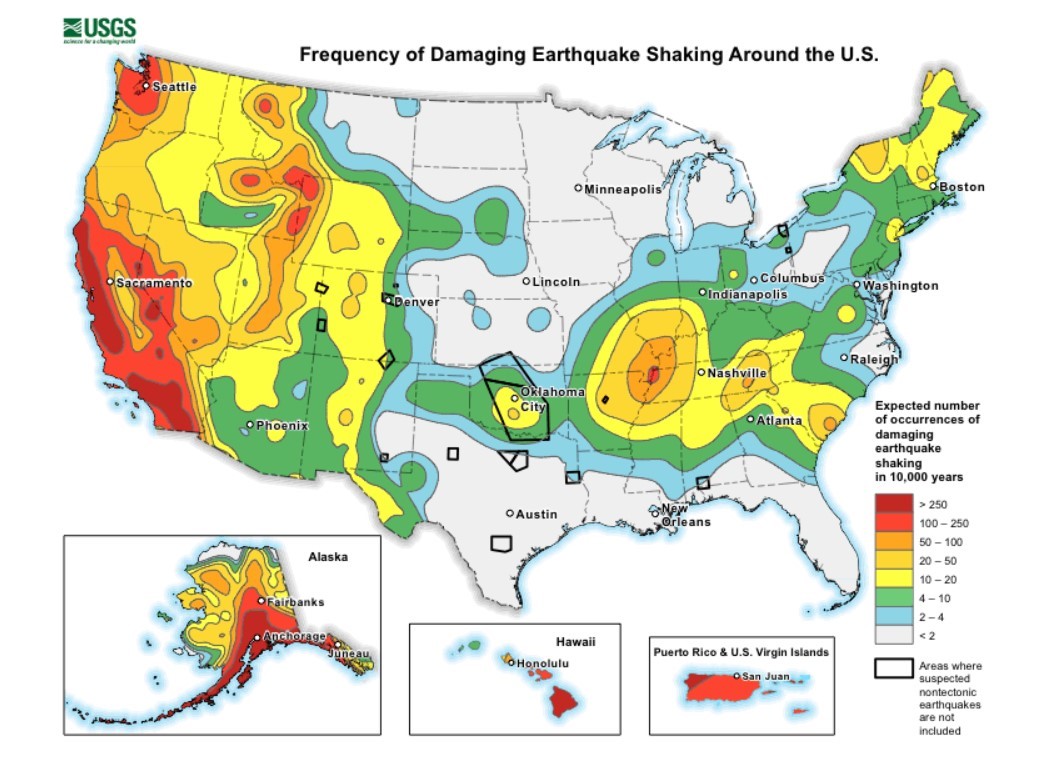
Earthquakes are a major threat to the structural integrity of homes across the United States (see map). Ensuring that older homes are retrofitted, and new residences are constructed to withstand seismic activity can mitigate much of the potential for collapse due to earthquakes.
What's My Earthquake Risk?
Earthquakes have been recorded in every state in the United States. However, some areas of the United States are more prone to seismic activity, for example, the West Coast and the south-central parts of the country (see the earthquake probability map, Figure 1). Since many of the construction techniques used to increase a home's resistance to high winds also increase its resistance to earthquakes, homes all across the country should be built according to these techniques.
Constructing New Homes to be Earthquake Resistant
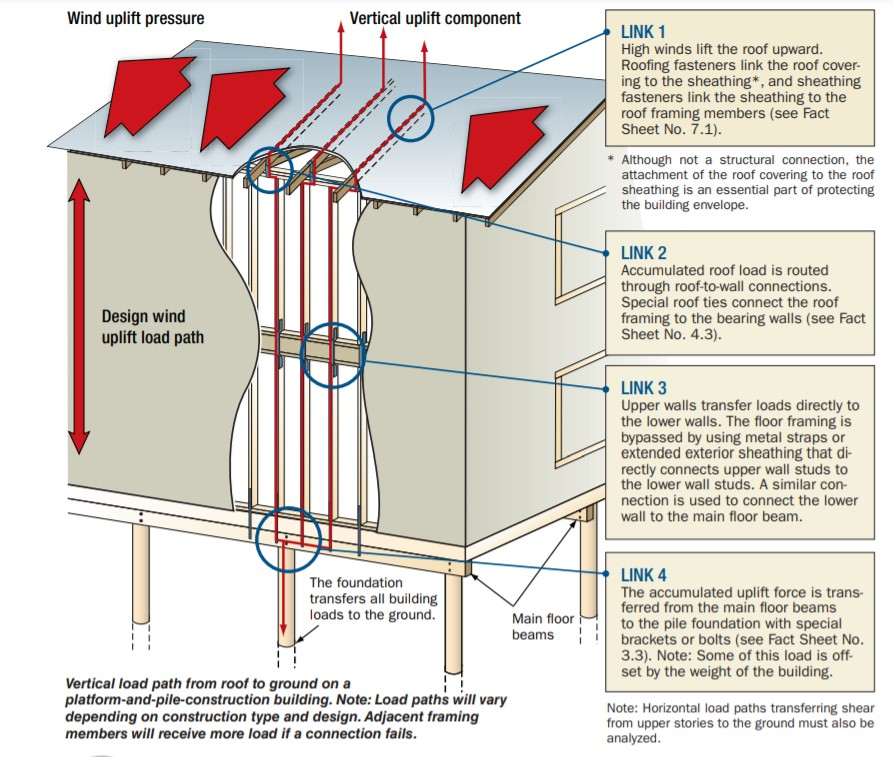
Every home in an earthquake zone should be designed to withstand seismic activity, regardless of the severity of the local zone. For older homes, this means retrofitting any potential weak spots. For new construction, building the home to the latest residential code will help ensure its structural integrity during a seismic event (FEMA P-2082-1, 2020). The basis of all earthquake construction should be to control and transfer lateral loads or "sheer" created by ground movement to foundations and the ground by employing sheer panels and a continuous load path (FEMA 232, 2006). The continuous load path ties the home together from the roof to the foundation using metal connectors and other materials to withstand the stress of lateral forces from earthquakes. The use of sheer panels and continuous load paths is similar to the approaches that are effective in addressing high winds. The important connection points within the continuous load path are shown in Figure 2 (FEMA P-499, 2010). These include:
- Roof to upper floor walls
- Upper to lower walls
- Lower walls to main floor
- Main floor to foundation
For new home construction, first choose a home site that is on a stable geological formation. Typically, deep unbroken rock formations (referred to as bedrock) are considered the most stable, whereas deep soft soils can transfer the most seismic forces to the home. Placing any home, no matter the strength of its construction, directly on or within 50 feet of a fault line is a recipe for disaster. Even at 50 feet from a fault line, destruction will be substantial (FEMA 232, 2006).
After a site is chosen, the following additional construction techniques should be utilized.
1. A solid continuous foundation must be poured to a depth at least 12 inches below grade for the base of the home. The FEMA Homebuilder's Guide to Earthquake Resistant Design and Construction explains that an effective foundation provides the following:
- Continued vertical support
- Friction and passive bearing at the soil-to-foundation interface to minimize movement and damage
- Anchorage at the foundation-to-house interface to minimize movement and damage (see Figure 3)
- Strength and stiffness sufficient to resist both horizontal loads and vertical loads resulting from racking and overturning of bracing walls within the house.

2. The walls provide the primary lateral resistance to earthquake loads (see Figure 4).
- Use foundation bolts to anchor the exterior walls to the foundation through the wall's bottom plate and foundation sill plate at a minimum of two bolts per plate.
- Install metal connectors to transfer overturning forces from walls above to walls below.
- Install hold-downs at each end of the wall to prevent uplift and overturning.

As Figure 4 shows, during a seismic event, forces are applied to a home at several points. Strengthening one part of a home may put added stress on another. Walls are subject to racking, sliding, and overturning forces. Anchors and hold-downs can help mitigate these potential risks.
3. Secure appliances and equipment within the home. In addition to tying down the components of a building's structure, it's also important to secure the equipment within the building. See the guides listed below under Equipment for information on securing fuel tanks, appliances, water heaters, and cabinets, and installing an automatic shutoff for the gas line.
Retrofitting a Home to Increase its Earthquake Resistance
Retrofitting an existing home to withstand earthquakes starts at the foundation. Some older homes are not bolted to their foundation and could slide off the foundation during an earthquake. Preventing the likelihood of this horizontal displacement by bolting the home to the foundation should be the first retrofit priority. Walls can be affected by seismic activity when bracing materials are lacking. Bracing materials for walls can include plywood, OSB sheet panels, prefabricated sheer panels, and high-density spray polyurethane foam. Some homes with crawlspaces have cripple walls, which are short walls that bridge the gap between the foundation and the first floor of the house. To better absorb lateral seismic forces, cripple walls should be braced on the inside with a strong material like plywood or OSB, as shown in Figure 5.
Retrofit Construction Techniques (City of Los Angeles 2020)
- Anchor the home to the foundation if it is not already anchored. See the guide "Bolt mud sill to foundation wall and reinforce cripple walls in existing homes" for additional guidance.
- Install anchor bolts in the sill plate according to the manufacturer's guidelines for each specific anchor bolt type.
- Choose one of two anchor types: adhesive or expansion. Both are used to keep a home tied to its foundation; however, the choice of which one to use depends on the strength of the existing concrete foundation.
- Expansion anchors:
- Should not be used with weak concrete.
- When used with strong concrete, expansion anchors are easier to install and cheaper than adhesive anchors.
- Adhesive anchors:
- Are used with weaker concrete foundations.
- These require placing a chemical mixture into a drilled hole and allowing the mixture to harden to reinforce the weaker foundation before installing the bolt.
- If installed correctly, adhesive anchors can be just as strong as expansion anchors.
- Expansion anchors:
- Select plate washers to secure the sill plate to the anchor bolts. Using round washers is not recommended; during an earthquake the wood sill plate can be split if round washers are used.
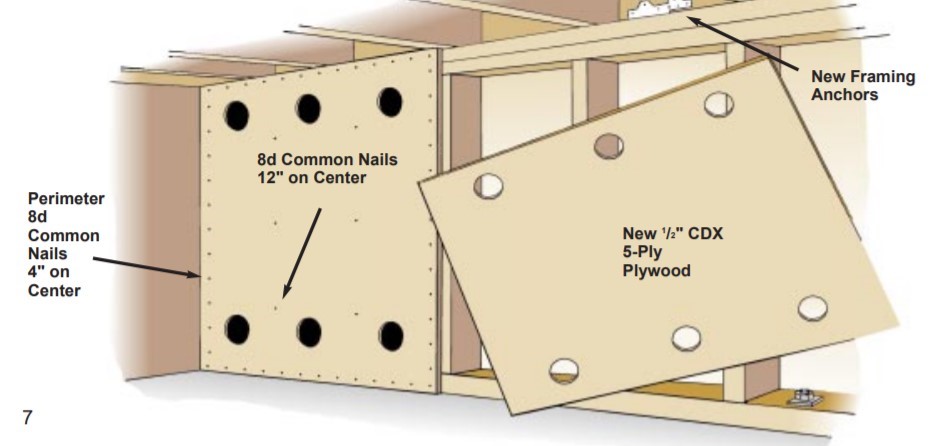
- Brace cripple walls with plywood to reduce the risk of whole-house damage during an earthquake.
- The plywood bracing provides rigidity to the walls and transfers the seismic forces.
- Plywood wall bracing is required at each wall end and for 50% of the length for one-story homes, 70% for two-story homes, and 100% for three-story homes.
- Plywood sheets should be at least 4 feet long and at least twice the height of the cripple wall.
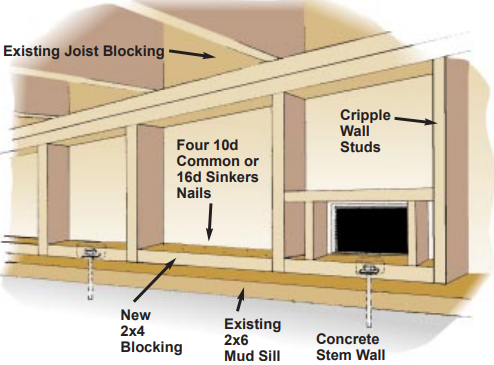
- Add blocking if needed. Blocking (the horizontal 2x4 pieces that sit on the sill plate between the cripple wall studs) should be installed if missing to provide a fastening surface for the plywood and framing anchors (see Figure 6). Anchor the home to the foundation if it is not already anchored. See the guide "Bolt mud sill to foundation wall and reinforce cripple walls in existing homes" for additional guidance.
- Install metal framing anchors to secure the cripple wall. Use framing anchors with adequate shear strength to connect the cripple wall to the rim joist above and to the sill plate below.
- Reinforce roof-ceiling systems.
- Add shear bracing members to roof trusses if there are not bracing members already in place or if there is insufficient shear bracing.
- Add a roof-wall connection system with strapping if there is not one already in place. The primary load carriers within the roof-ceiling system are the roof sheathing and the fastening. Normally the roof-ceiling system will deflect the load from an earthquake horizontally and transfer the energy to the supporting walls, and then to the foundation.
- Use metal connectors to connect every truss or rafter to the top plates of the exterior walls.
- The metal connectors from the roof structure to the top plate and the top plate to the stud must be on the same side of the wall.
- Replace any damaged wood framing.
Earthquake Guides
The following guides provide information on making the components and assemblies of a home more resistant to earthquakes.
Roof:
- Bracing of roof projections (dormers, skylights)
- Retrofit of Existing Roofs for Hurricane, High Wind, and Seismic Resistance
-
Chimneys Connected to Roof Structure
Walls/Windows/Doors:
- Seismic and Insulation Retrofits of Solid Masonry Walls
- Wall Bracing for Hurricane, High Wind, and Seismic Resistance
- Insulated Concrete Forms
- Structural Insulated Panel or panel construction walls
Building Attachments:
- Porches, carports, and deck attachments
- Chimneys connected to the roof structure
Foundation/Site:
- Slab-on-grade foundations with turned-down footing
- Continuous load path provided with connections from the roof through the wall to the foundation
- Bolt mud sill to foundation wall and reinforce cripple walls in existing homes
Operations/Equipment:
- Storage space provided for emergency supplies
- Water heater elevated and secured
- Automatic gas shutoff valves
- Appliances anchored for disaster resistance
- Self-locking cabinets, drawers, & doors
- Fuel tank anchored
Design:
- Design for earthquakes
In addition to these guides, the Solution Center contains an extensive collection of references, training videos, images, and webinars on disaster-resistant construction related to earthquakes. These can be found by searching "earthquake" in the Solution Center.
Access to some references may require purchase from the publisher. While we continually update our database, links may have changed since posting. Please contact our webmaster if you find broken links.
References and Resources*
*For non-dated media, such as websites, the date listed is the date accessed.
Contributors to this Guide
The following authors and organizations contributed to the content in this Guide.
Pacific Northwest National Laboratory
Mobile Field Kit
The Building America Field Kit allows you to save items to your profile for review or use on-site.
Sign Up or Log In
orlandoseaspicea93.blogspot.com
Source: https://basc.pnnl.gov/information/earthquake-overview
0 Response to "My Slab House is Being Damaged by Continuous Movement of the Ground Up and Down After Quake"
Postar um comentário